
Windows 7 end of support is upon us in 1 more day (1/14/2020). This post tries to answer the question on whether you can safely continue to run it. The short answer is that you can't, atleast if it is connected to the outside in some form.
However, I have a friend back in India who has some software that he relies on and he can't run it on modern Windows. So when I was answering his question on how he can run it, I thought I'd write it up in the blog as well.
This post outlines how you can run Windows 7 in virtual machine running on Microsoft Hyper-visor on a windows 10 machine. The process also uses checkpoints to reset the VM back to the old state each time. This ensures that even if something malicious gets hold of the system, you can simple go back to the pristine state you started with.
Pre-requisite
Obviously you need a computer capable of running Hyper-V. For my purpose I am using a Windows 10 Professional machine. You should also have more than enough CPU cores and memory to run Windows 7 in that machine. I recommend atleast 4 cores and 8GB memory so that you can give half of that to the Windows 7 VM and keep the rest for a functional host PC.
Get hold of Windows 7 ISO or download it from https://www.microsoft.com/en-us/software-download/windows7.
Get hold of Windows 7 ISO or download it from https://www.microsoft.com/en-us/software-download/windows7.
Then visit the system requirement https://support.microsoft.com/en-us/help/10737/windows-7-system-requirements. I decided to give roughly twice the resources as the requirements to create my VM.
Setup VM
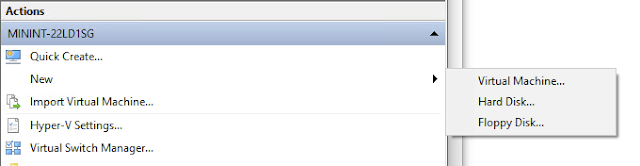
Hit windows-key and type hyper-v to launch. Then start creating a VM by clicking New and then Virtual machine.

Choose the following Generation 1

I decided to then give it 4GB memory and 2 CPU cores

Chose to create a 40GB OS disk

Then install from bootable CD and pointed the location of the image file to the downloaded ISO image

Click through next to end and finish the creation wizard. Then right click on the newly created VM and choose "Connect".

Install Windows 7
At this point if everything went well the VM has booted off the installation ISO and we are on the following screen. Choose "Clean install" and proceed through the installation wizard.

Finally installation starts.

A reboot later we have Windows 7 starting up!

Created a username, password

Finally booted into Windows 7 and here's my website displayed in Internet Explorer

Secure by Checkpoint
Even though we have booted into Windows 7 soon this will be a totally unsupported OS, that means no security updates. This is a dangerous system to keep open to the internet. I recommend never doing that!! Also to be doubly sure, we will create a checkpoint. What that does is it creates a snapshot of the memory and the disk. So in case something malicious lands in this VM, we can go back to the pristine state when the snapshot was created and hence rollback any changes made by the virus or malware.
To create a checkpoint right click on the VM in hyper-v manager and choose Checkpoint

You can see the checkpoints created in the Hyper-V Manager.

Lets make a change to the Windows 7 VM by creating a file named "Howdy I am created.txt" on the desktop.

Since the checkpoint was created before creating the file, I can revert back to the checkpoint by right-click on the checkpoint and choosing Apply.

After applying the checkpoint when I go back into the VM, the created file is all gone!!!

Finally
This is a hack at best and not recommended. However, if for some applications or other need where you "have" to run Windows 7, this can be an option.
No comments:
Post a Comment